How we made $467.00 spending $18.00 with FB Ads (Facebook Remarketing Case Study)
This case study describes the steps and tricks that are necessary to prepare and launch dynamic remarketing on Facebook.
We constantly test new marketing strategies, define the most profitable of them, and gladly share our experience with you. One of the best methods we recently discovered is dynamic remarketing on Facebook which turned out to be a highly effective sales method!
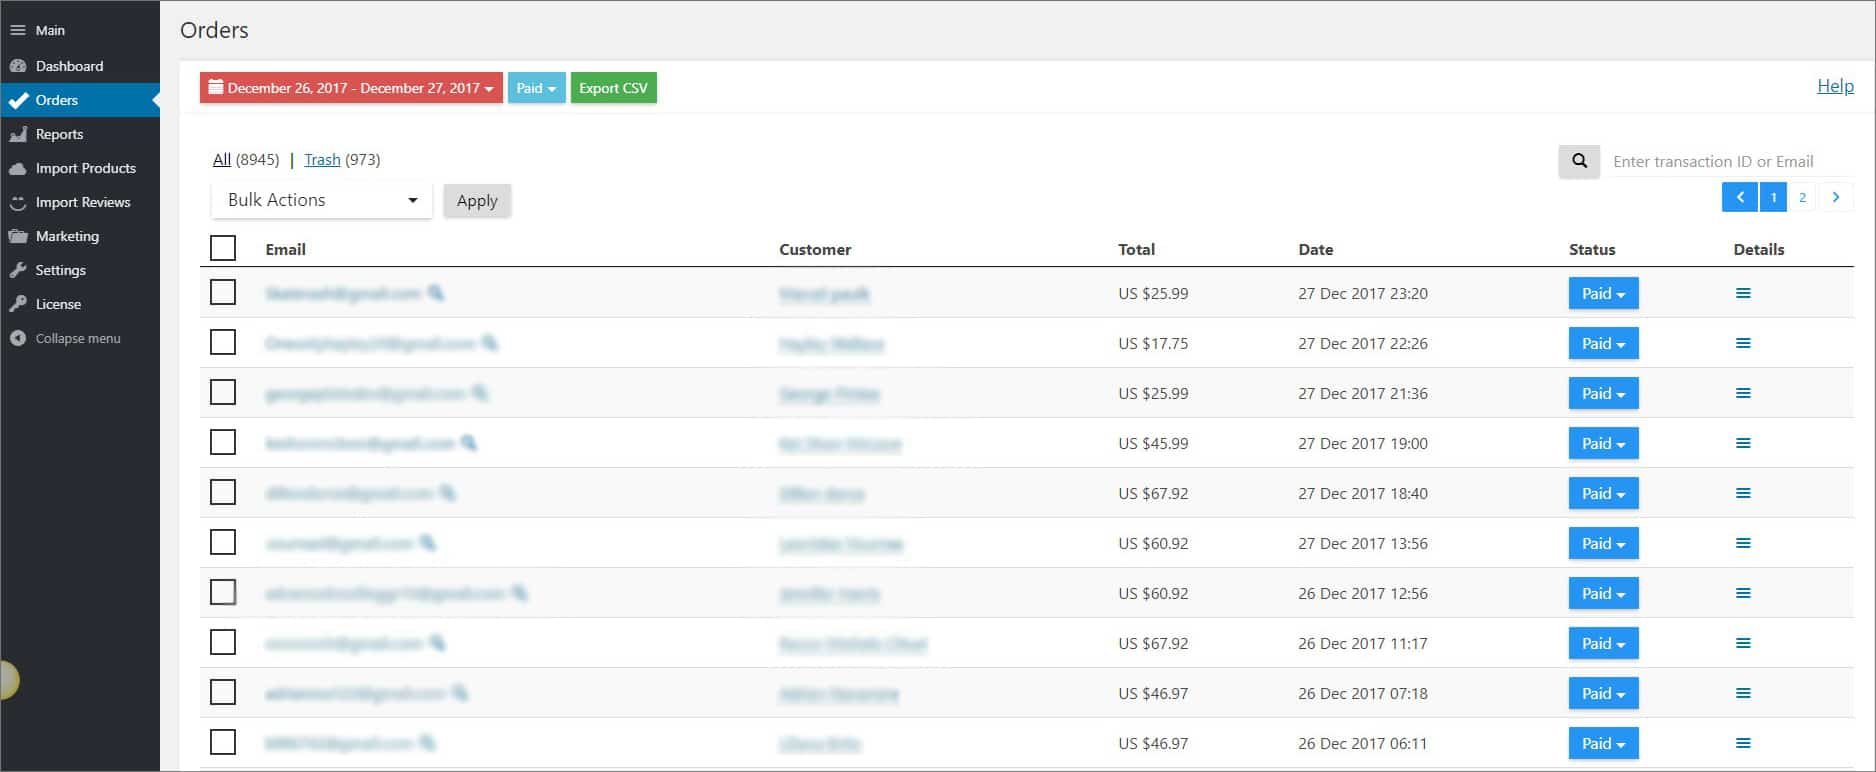
In two days, we only spent $18 and got more than great results – 10 purchases for $467 in total! Each purchase cost us $1,82, but brought the revenue of $46.
Pretty impressive, huh?
So in this Facebook case study, step by step, we will show you how to create an advertisement of this type, and describe the tricks that will lead you to success.
Follow our instructions, and you’ll also get a great result from these Facebook ads!
When you have dynamic remarketing adjusted, you are able to make ads that are highly attractive to Facebook users. The thing is, these promotions are based on their actions and personal features: your web store pages that they recently visited, purchase history, and demographic data. Plus, the related products, your bestsellers, and the most popular content pages are also taken into account.
Generally speaking, remarketing helps you establish a repeated contact with the users who previously interacted with your webstore in some way. For example, the users who left your store without making a purchase can get involved in this promotion.
The main advantage of Facebook is that you don’t depend on the site cookies and you can show ads to this or that specific person regardless of the device he or she uses to visit the site.
What are Facebook remarketing ads?
Facebook ads are promos that show either one of your products or several items at once.
Facebook visitors can see dynamic remarketing ads:
- In their news feed or in the right column of the Facebook pages;
- In their news feed on Instagram;
- On websites or in apps that are included in Audience Network platform (Audience Network makes it possible to create advertising campaigns outside Facebook and reach your audience via mobile apps, websites for devices, instant articles and video sites)
How to create Facebook remarketing ads: preparations
1. Create your own advertising account in Facebook Ads Manager
To start making any type of ads on Facebook, it is necessary to create an advertising account. Choose the “Create Ads” option in your Facebook account menu. This click will automatically begin your advertising account creation.

2. Set up Facebook Remarketing Pixel
To make sure your remarketing ads function correctly, you need Facebook to receive data on the pages visited by your customers. So, you need to create and set up Facebook Pixel on your site. To learn how to do this, please read the step-by-step guide.
PLEASE NOTE: After you use this Facebook Pixel set up method, you’ll be able to track such multiple important events (goals): “View Content”, “Add to Cart” and “Purchase”. All of them are vital for dynamic remarketing.
3. Make sure Facebook Pixel works correctly
When the adjustment process is over, check that the system tracks all the necessary events.
Set up a useful Google Chrome extension called Facebook Pixel Helper: here you can read more about it.
Then, go on your site and click the Pixel Helper’s icon. A window with the code will appear, and you’Il be able to check if there are any errors identified.
Facebook Pixel Helper marks the errors with either yellow or red color. The yellow mark means that Facebook recommends fixing this issue, but it’s not a crucial one and it doesn’t really affect retargeting process. The red mark means that this issue makes Facebook Pixel work incorrectly. Using the Facebook suggestions, you’ll be able to easily fix such issues.
Creating Facebook dynamic ads with product catalog
A catalog is a structured data file that contains a list of your products. Each line of this file contains data that is necessary to create a corresponding dynamic advertisement.
Manual compilation of a product catalog is pretty hard, and you’ll probably need a skilled developer’s assistance.
To make it easier to create dynamic ads, our experts developed Facebook Business add-on (hooray!) that automatically creates a product catalog just in two minutes! We’ll show you how to make effective dynamic advertisements with the help of this add-on.
Step 1. Create a product catalog on Facebook
Go to your Ads Manager account and press “Catalogs” button.
If it’s the first time you’re creating a catalog, this step will activate the catalog manager. Click “Create Catalog”.
Choose the necessary type of the catalog – you need the “E-commerce” one, and click “Next”.
Name the catalog, click “Next” again.
Voila, you’ve created the catalog! Press “View Catalog” button.
Now add products to your catalog by clicking “Add Products” button.
Upload the product catalog you’ve generated with Facebook Business add-on.
Tick the “Upload Once” box. This function is recommended if you want to upload the catalog yourself.
Further, it is necessary to set up Facebook Business add-on on your site, adjust its settings, and generate the file that will become the foundation of your product catalog on Facebook.
Read all the details about Facebook Business add-on work and settings customization here.
Once you click the “Generate XML” button, you get an XML-file that you will need to upload to your Facebook catalog.
You can also change the name of your catalog. Press the “Start Upload” button.
Now, your catalog is ready! You can read the detailed instructions on the catalog creation and the review of other downloading functions here.
Click the “View Feeds” button to view the catalog you’ve created.
Make sure your catalog has no critical errors that are marked red. They affect the adverts’ reach on Facebook. If Facebook warns you about such errors, follow the recommendations on fixing them.
If you see some errors that are marked yellow, pay attention to them as well. You can fix them with the help of Facebook recommendations, or leave them as they are – these errors don’t have much influence on ads’ reach.
If your catalog doesn’t contain any errors, you’ll see “All good” line. Click on the catalog name and look it through.
Make sure you have uploaded all the products you needed.
If everything is OK, start creating an advertisement!
Step 2. Create Facebook remarketing ads on the catalog’s basis
Go to the Ads Manager.
Choose the “Catalog Sale” ad type and choose the catalog you’ve created.
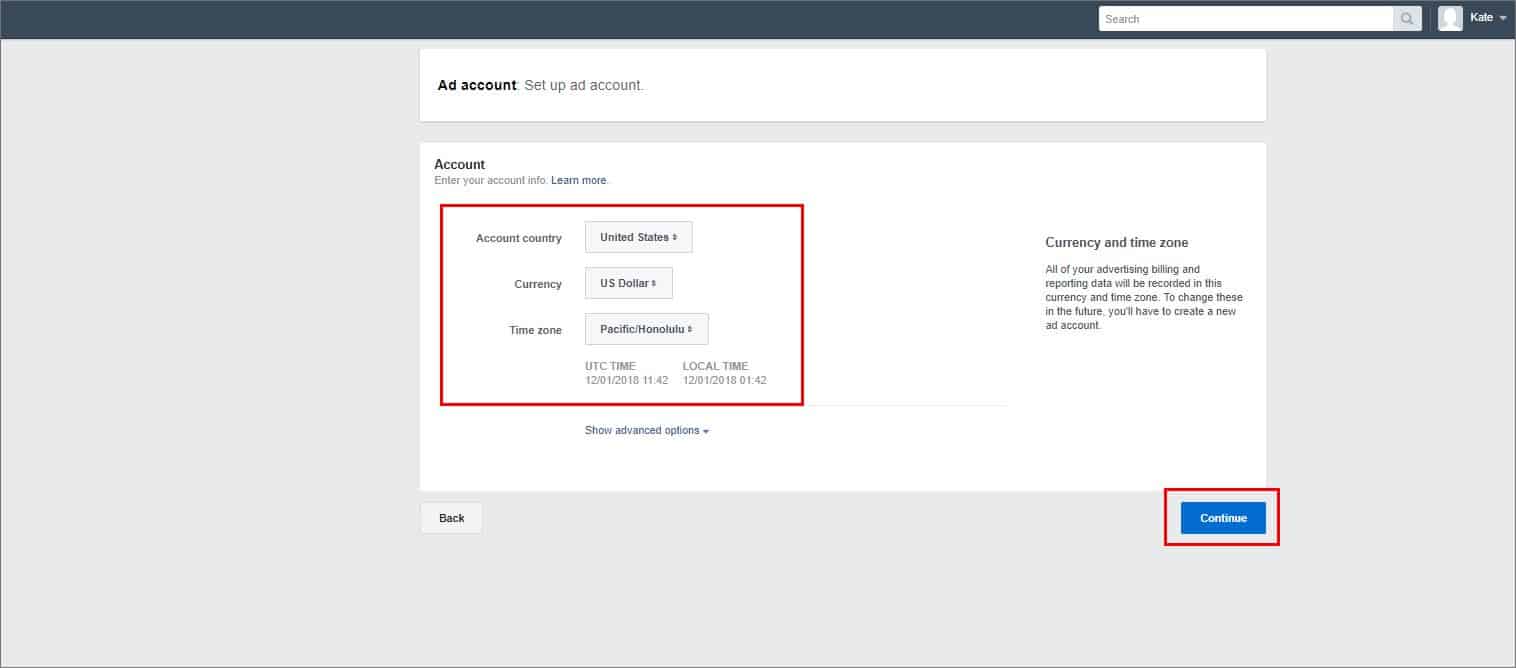
Adjust your catalog parameters according to the currency and time zone you find suitable for your store.
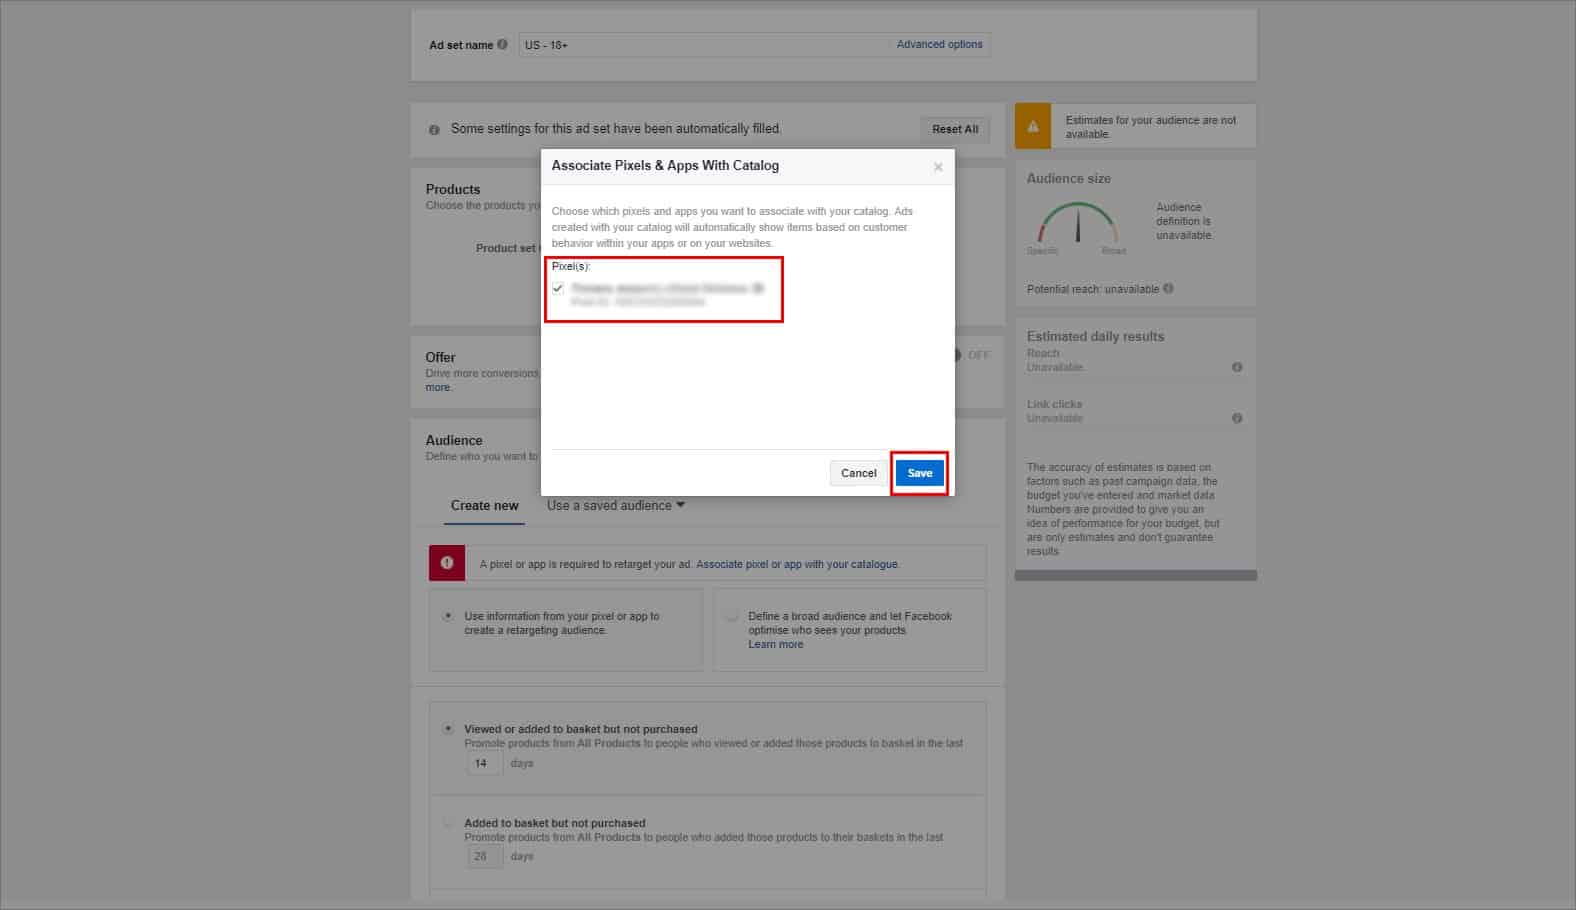
Associate your catalog with Facebook Pixel. If you have several pixels, choose the one that is relevant for this particular store.
Attaching Facebook Pixel to the catalog is a very important step because it helps you track the visitors’ actions in your store. This way, you will efficiently use the retargeting function and reach the users you need.
After you attach the Pixel to the catalog, you can adjust the basic settings of your ad.
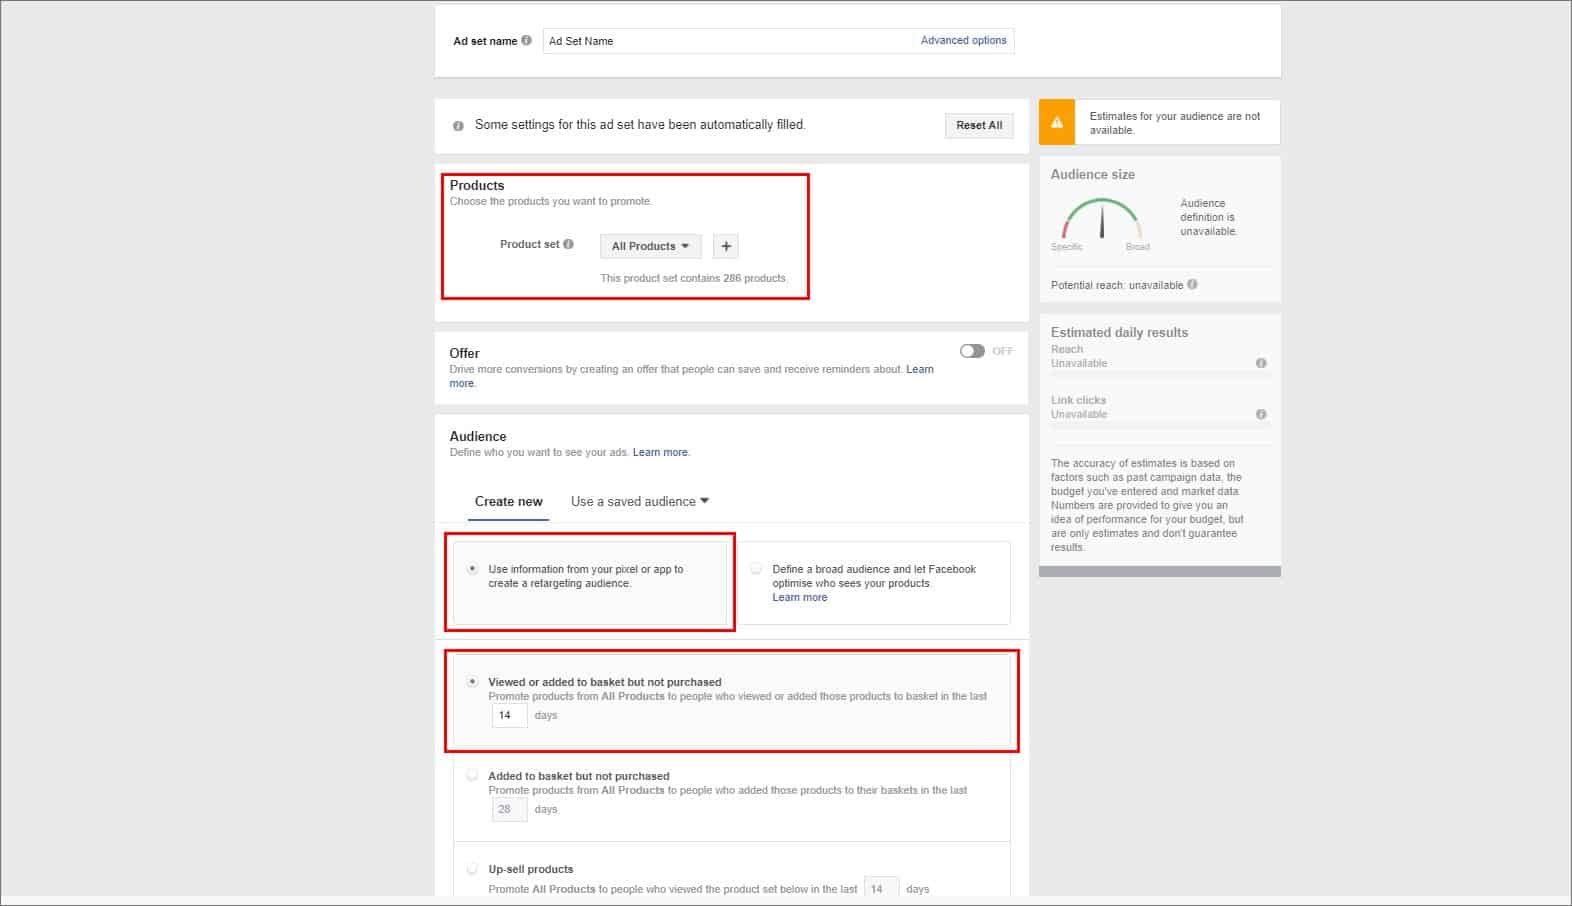
The “Products” section shows the catalog you’ve uploaded and chosen for advertising.
Choose the “Use information from your pixel or app to create a retargeting audience” option. It means that you’ll use the data collected on your website by the Facebook Pixel with regard to the three events: “View Content”, “Add to Cart” and “Purchase”.
Choose the “Viewed or added to basket but not purchased 14 days” option. If you do that, you’ll show your ads only to the people who visited your site, added some products to the cart, and left without making a purchase in the last 14 days.
NOTE: You are free to experiment with this option. For instance, you can choose a longer period since the moment a customer visited your site – 20 days, 28 days, etc.
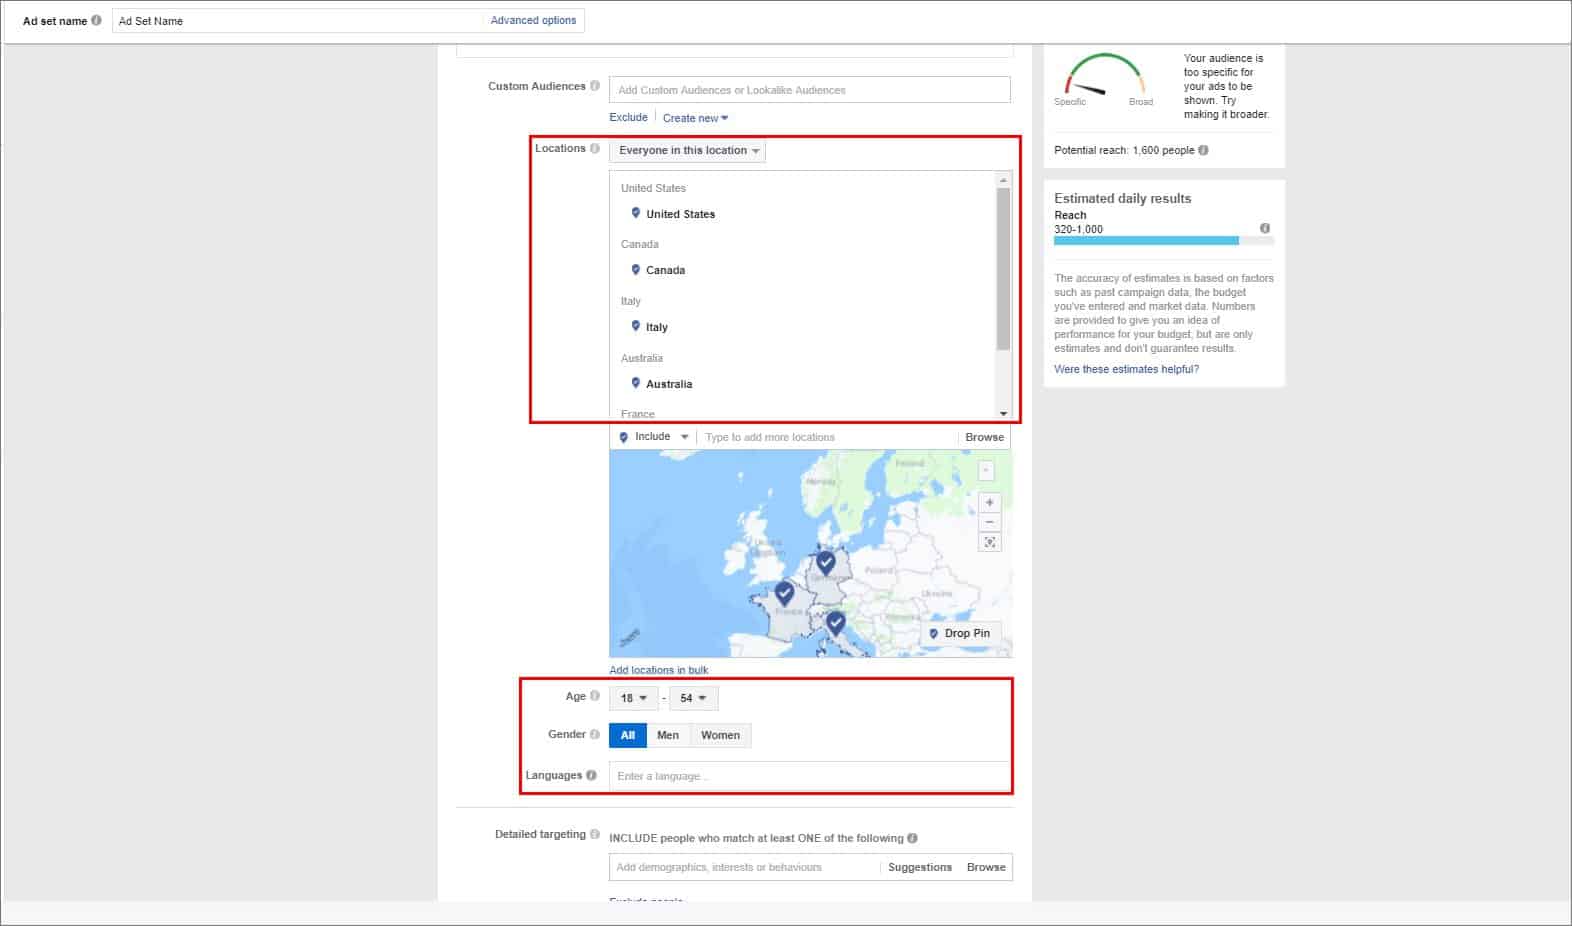
We also need to choose specific countries for the ads targeting. To do this, click the “Show advanced options” link.
We’ve chosen 6 countries with the highest “Add to Cart” and “Purchase” conversions rate for our site. In other words, people from these 6 countries buy from our store the most often.
While selecting the settings for our first advertisement, we do not specify audience age, gender or language. We need that to closely analyse the results and optimize this ad in the future.
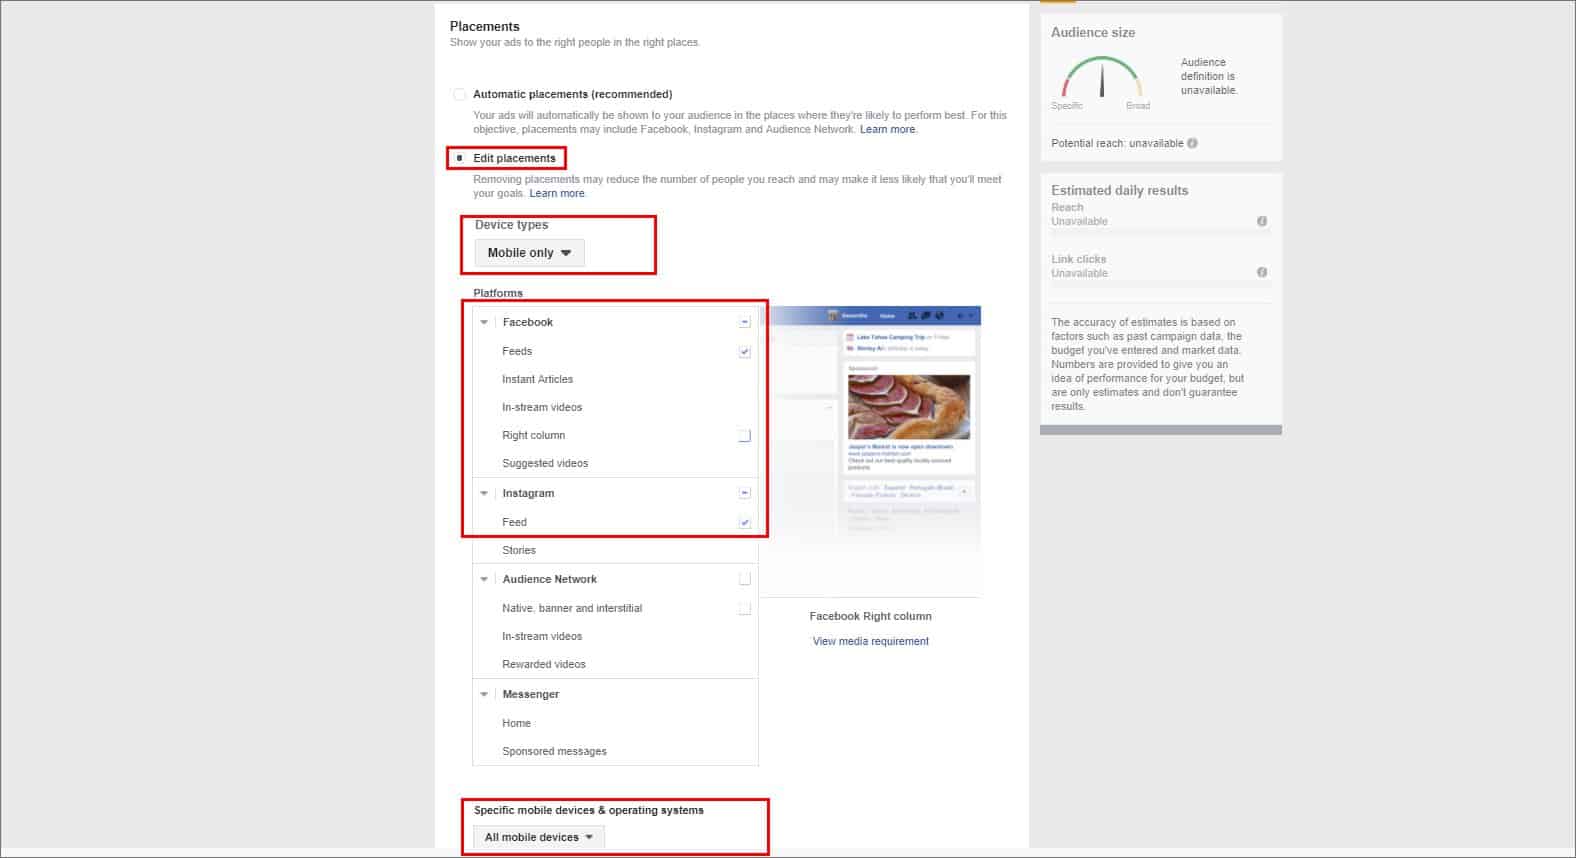
Choose the “Mobile Only” option. We choose it since we know that purchases from mobile devices prevail in our store.
Choose placement for your advertisement message. In our case, we choose Facebook – Feed and Instagram – Feed.
NOTE: Experiment with ads placement and type of devices. For example, you can switch on such placement as Facebook – Right Column and show ads on desktop devices.
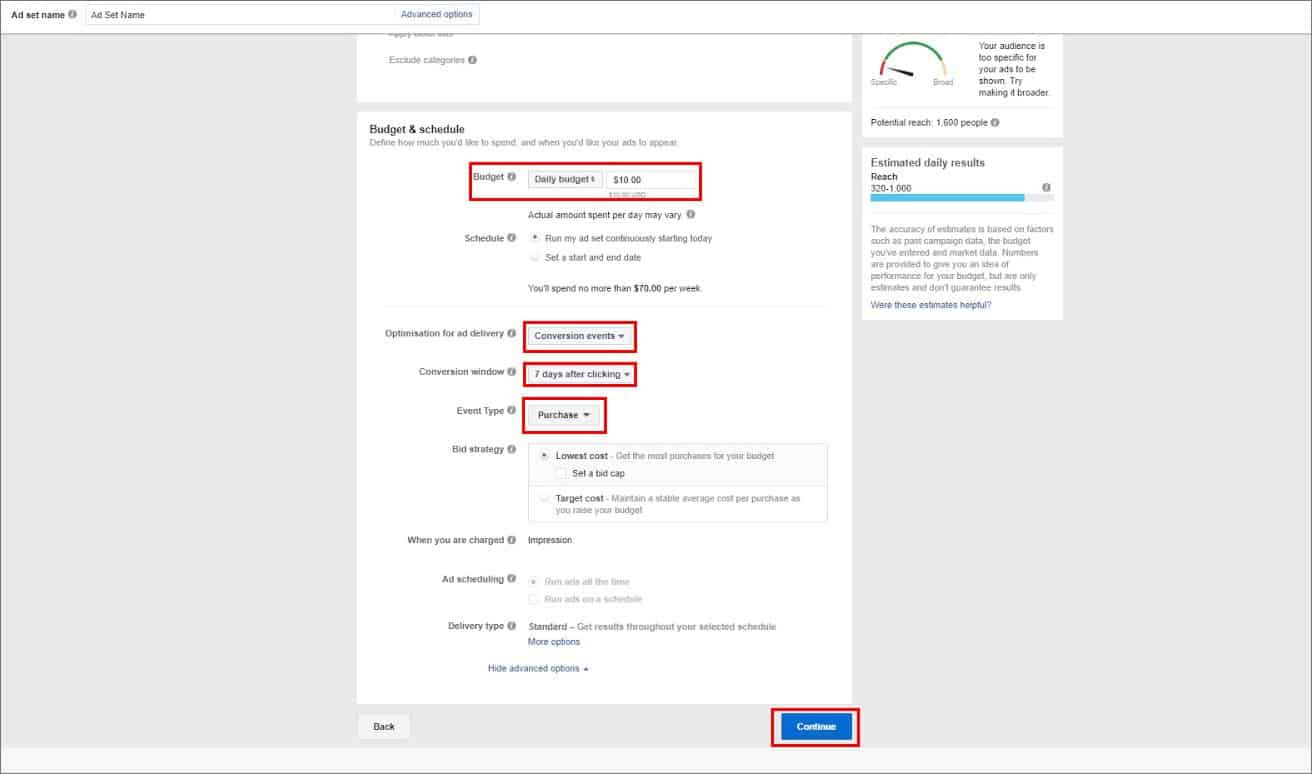
Set a daily budget for your ad. Our minimum one is $10, and we try not to set smaller budget.
In the “Optimization of an ad delivery” menu, choose the “Conversion results” option. In the “Conversion window” menu, click the “7 days after clicking” option. These settings will let you track purchases made not only right after clicking on your ad, but also during a week after visiting your site through this ad.
In the “Event type” menu, choose the “Purchase” type of event. This way, Facebook will be able to search for users who are very likely to buy something from your site.
You can experiment with the event types. For instance, you may optimize the ad for the “Add to cart” event – then, Facebook will search for users who add products to cart often. You can choose the event type only once for one ad. In other words, if you’ve chosen “Purchase” event type, you can’t change it in a running ad.
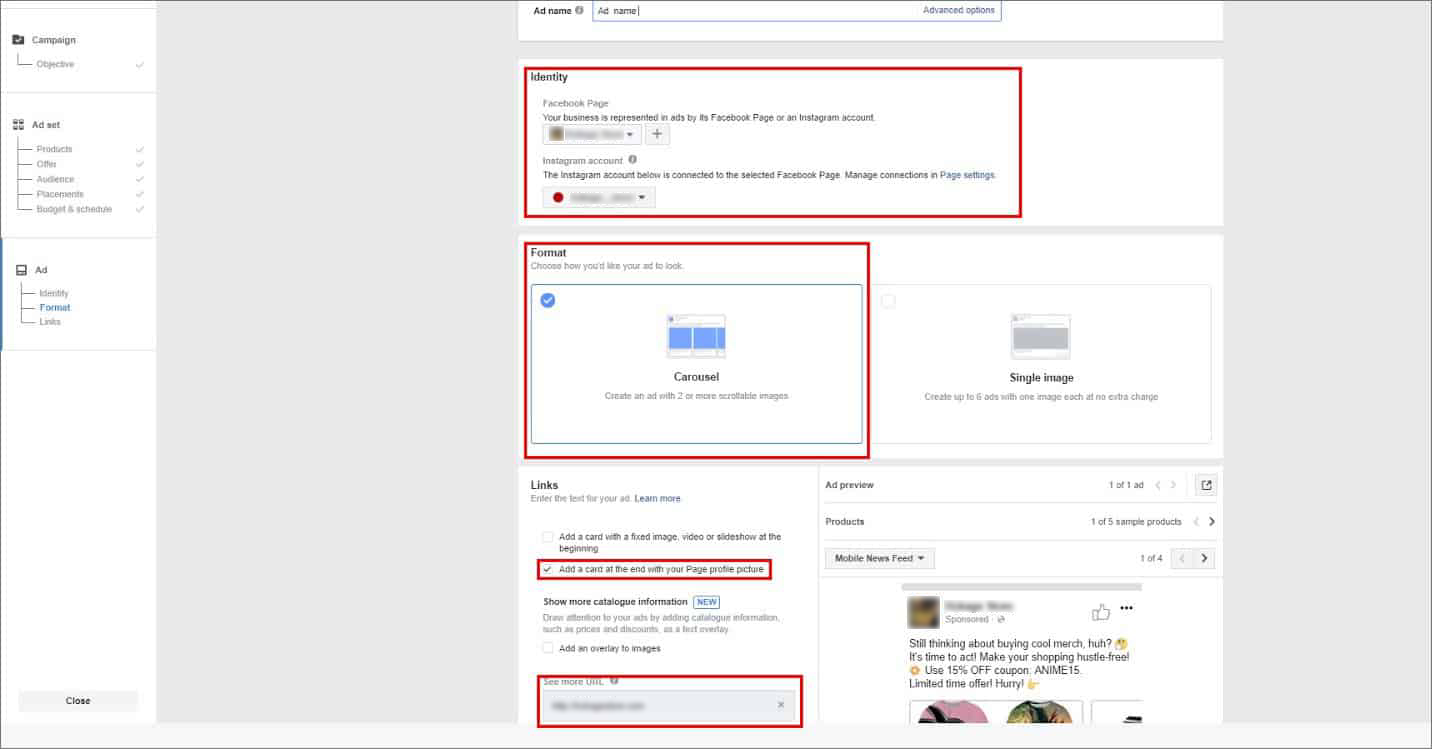
Click “Continue” and start customization of your advertising message. Choose your store’s Facebook page and Instagram account.
Set the format of your ad, our choice is “Carousel”. This format allows to show several products from our store at once.
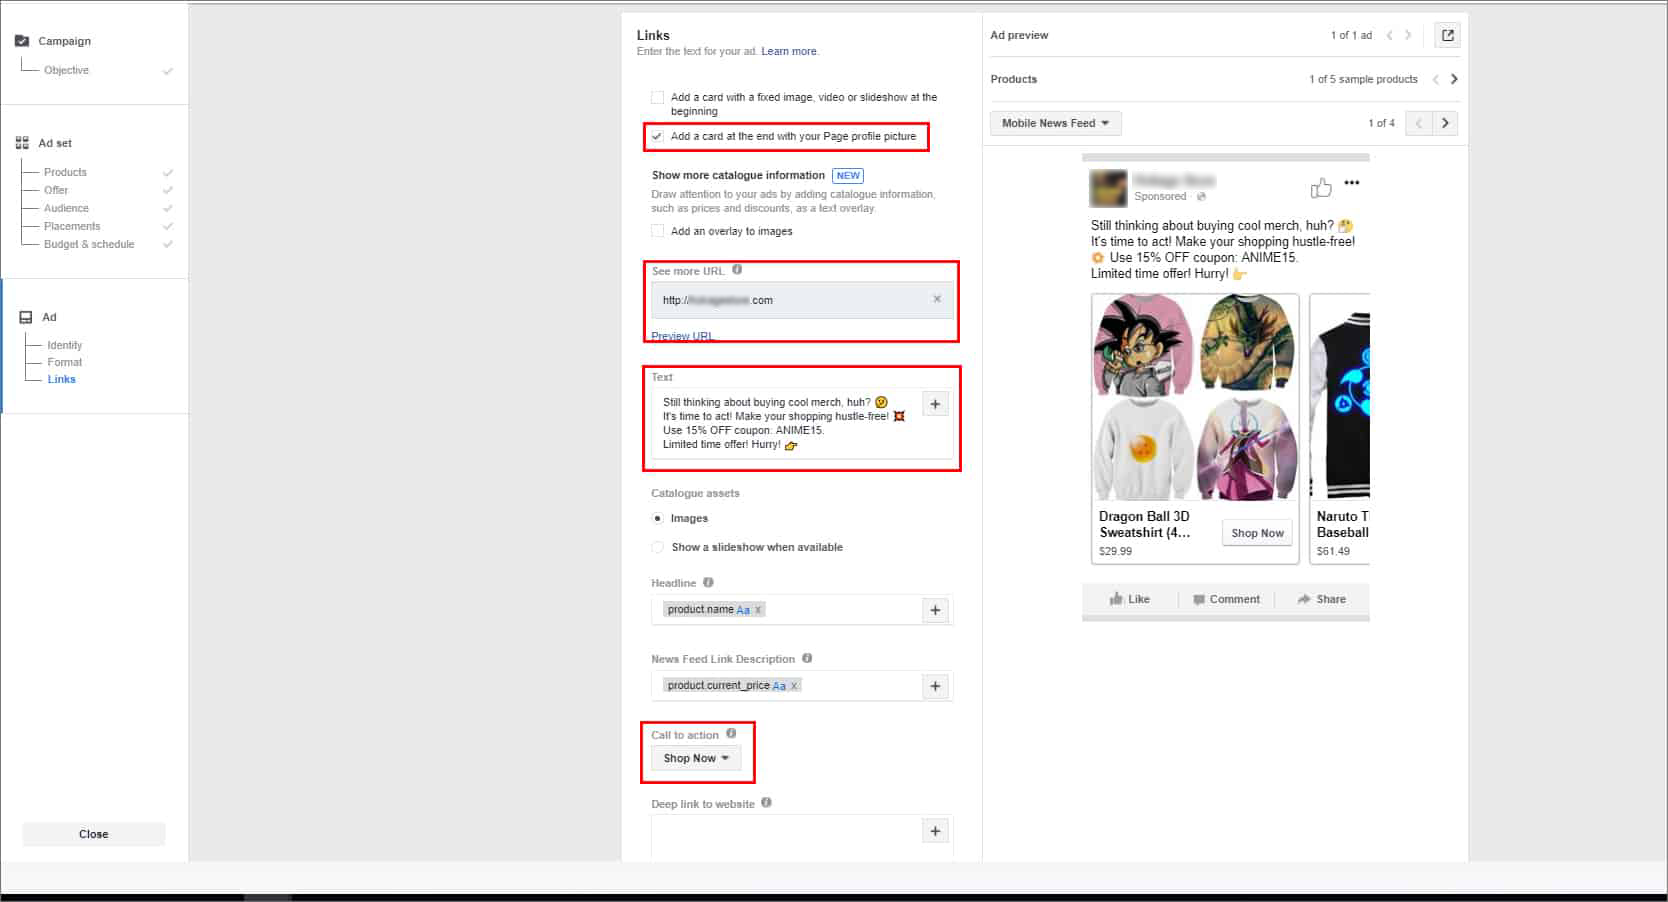
Select the “Add a cart at the end with your Page profile picture” and add a link to your site.
Create the text for your ad message. Our ad format shows users the same exact products they viewed on our site or added to the cart. If a user added something to the cart but but never bought it, we can offer them a discount to encourage a purchase.
Here’s our sample ad text:
“Still think about buying cool merch, huh? It’s time to act!
Make your shopping hustle-free! Use 15% OFF coupon: ANIME15
Limited time offer! Hurry!”
You can make your ad more attractive with emoji, but go easy on it.
In the “Call to action” menu, find the most suitable call for your store. We’ve chosen the “Shop Now” one.
Check how the ad looks in the placement you’ve selected.
Make sure Facebook Pixel is turned on. Click “Confirm” to run the ad.
Press “Continue”, and Facebook will start examining your ad. This step is an abiding procedure: Facebook checks if your ad meets Facebook ads policies. We strongly recommend to read the rules of ads placement before ads creation.
NOTE: Don’t change any settings in a running ad since it will interrupt the process and worsen the results. Any changes in the settings must only be done in ads duplicates.
So, now you know how to create dynamic ads on a product catalog basis. Usually, we let an ad work for a couple of days, then we start analysing it.
The ad we’ve made has been working for 2 days and it brought us 10 purchases. All in all, we spent $18.20 and get really great results with $1.82 conversion cost!
Step 3. Analyze and optimize your Facebook Remarketing Ads
To make our ads even more efficient, we always analyze and optimize them.
Let’s see how you can improve an ad.
For this purpose, we will examine data about our customers. From now, on I’ll use word “optimization” that means improvement of an ad to reach bigger results.
NB: To create a new, better ad, you’ll need to make an ad duplicate and change its settings according to the results of your analysis.
Age.
Click “Breakdown” and choose the “By Delivery” option. Select the “Age” option.
In our ad, we didn’t set any detailed age targeting intentionally: we wanted to find out the age of people who respond to our ad more actively. However, we already know that our main target audience is aged 18-24, but we also have older customers who buy gifts for their children.
We supposed that adults need more time to make a buying decision, and this retargeted “catching up” ad with a discount offer can motivate these customers on making a purchase.
Conclusions of the ads results analysis: Young people of 18-24 years old made 8 purchases from us. 35-54 years old buyers made 2 purchases. Our hypothesis about the adult customers was more or less proved, but not to the extent that could motivate us to continue showing our ad to this audience group.
If you receive similar results and anyway would like to deal with this particular age group, create a more specific ad for them: think about the appropriate design and text.
Ad optimization: before optimizing your ad, select the age of customers who are the most likely to make a purchase.
Geographic location.
In the “Breakdown” menu, select the “Country” option. Here, you’ll see which countries are the most important source markets for you. For example, as we have USA, Canada and France here, the citizens of these countries made the biggest amount of purchases from us. In addition, you’ll see countries your budget was spent on.
Conclusions of the ads results analysis: Theoretically, we could have chosen only these 3 countries for our optimized ad. However, there’s a possibility it will worsen the ad results. Why? Well, we noticed such a trend: the less countries we select for our ad targeting, the more expensive the conversion cost becomes. In this particular case, we’ll leave all the countries as they are, since, as our statistics say, our customers live mainly in these countries.
To increase our ad delivery frequency for other countries (besides those three ones), we’ll increase our budget to $15-$20.
Platform and placement.
Conclusions of the ads results analysis: Our ad was set to be shown in the mobile version of Facebook (Facebook – Feed) and in Instagram Feed. We see that we have 6 purchases from Facebook and 4 ones from Instagram. So, the results are almost equal.
Ad optimization: Facebook and Instagram placement is OK, we won’t change placement in the settings of an optimized ad. We can also make two separate ads – one for Facebook with $15-$20 daily budget, and one for Instagram with the same budget. After this experiment, we’ll see how the ads work when we separate the platforms. If you have some financial limitations, choose only one platform that you consider to be the most suitable for your dropshipping store. Alternatively, try turning ads on and off. We are aware that our target audience usually buys via Instagram. Nevertheless, we would like to experiment with Facebook more.
Devices.
Conclusions of the ads results analysis: We see that Android and iOS mobile devices brought us 5 purchases each.
Ad optimization: When adjusting our optimized ad settings, we’ll still choose all mobile devices for our ads delivery. You can choose any devices you need if you sell accessories for iPhones, for example. However, we do not recommend to decrease audience volume by this parameter.
Products.
Conclusions of the ads results analysis: According to the data, the customers were mainly buying clothes. It is a common tendency for our store, and we are pretty happy about it since we are free to set bigger mark-ups for this type of products.
Ad optimization: As an experiment, we can create a product catalog that only contains clothes, and run an ad on its basis. Also, it might be useful to increase our ad budget up to $15-20 – then, Facebook will show the ad to more people who viewed your products or added something to the cart (not only clothes, but also products from other categories of your dropshipping store).
Frequency.
This parameter needs a really close attention from your side: it indicates how many times your ad is shown.
To adjust the indication of this parameter, add a column with this parameter to the menu.
Frequency tells us how many times one and the same person sees our ad. We highly recommend to keep an eye on this parameter. Even the most successful ad can burn out, start bothering people, and it inevitably leads to worse results and conversion cost increase.
Keep an eye on the frequency rate when any targeted ads are running, and change the design or texts on time.
Our ad is set to be shown only to our store visitors who added something to the cart but did not buy anything for 14 days. Taking it into account, we understand that the targeted amount of people is limited – that’s why we always watch Frequency rate.
The critical value for us is 5 or 6. But sometimes, even when it’s 3, the conversion cost starts growing and we hurry up with the ad optimization.
Lifehack: to boost your dropshipping store traffic, make an ad about your store blog post on Facebook or Instagram. Read more details about this technique here.
In addition, to increase the number of the people the ad will be shown to, select a longer period of time for Facebook Pixel to gather the data on your site. For example, take 28 days. To put it simply, your ad will be shown to people who visited your site, added something to the cart and bought nothing for last 28 days.
All in all, any ads that lead to the traffic increase on your site, and the retargeted “catching up” ads are only shown to the people who already know about your store.
Overall conclusions on the Facebook remarketing ads analysis and optimization
Always analyze the results you get and improve ads. If your advertisements are profitable, increase the daily budget. The thing of paramount importance here is to try to understand the target audience of your store. It will improve your advertising message.
Dynamic advertising based in the use of a catalog is a very powerful tool of Facebook Ads Manager account. It has lots of other useful functions which can help developing other advertising strategies.
Use Facebook Business add-on to create any product catalogue in a quick and easy way. This add-on has very simple settings, and you gain a lot from using it. You save your time and energy, plus, you create technically correct(!) catalogue for your advertising.
Study ads settings, experiment with them, and stellar sales in your dropshipping store are guaranteed!
I hope our case study will become a great assistance, and you’ll use it to increase your dropshipping store profit and get impressive results with Facebook Remarketing Ads!

tutorials and special offers from AliDropship





What a wonderful article! I bet nobody on the internet could have explained it better than you did. Thanks so much 🙂 xx
Thank you so much! I’m doing my best!
I am a Facebook newbie, so I’d like to ask if I uderstood it correctly:
The described process only makes sense if you already had some traffic from real users on your site, right? I mean, remarketing is by definition making customers return in some way.
So it doesn’t make sense to use this for a new store. Or let’s say there are probably better ways for facebook-marketing if you stared freshly.
If I’m right, which ressource/case study would you reomment for a new store?
Greets!
George
Thanks for this
Hi, a nice and insightful article.. Thanks… I am new to drop shipping and i just had my shop set up, can you please give me ideas on which type of facebook Ads to run to drive traffic to my shop and facebook page as well. Thanks again
Hi, thank you for your feedback and question!
To begin with, pease, read this article to learn the difference between Facebook ads and boosted posts: https://work10.alidropship.com/tag/facebook-promotion/
Then, please, read these 2 articles as well to make the most of your ads: https://work10.alidropship.com/facebook-ads-tips/ and https://work10.alidropship.com/10-facebook-ad-mistakes/
Best of luck with your venture!
Very informative, thanks