How To Promote Instagram Posts: Mobile App Vs Facebook Ads Manager
Every day, Instagram ads generate new sales in our dropshipping stores. People like this social network very much, and typically spend a lot of time browsing it. This is why it is such a great idea to promote your ecommerce business on Instagram and make your potential customers familiar with your online store! So, let’s figure it out how to promote Instagram posts with the maximum efficiency possible.
In our experience, Instagram ads lead to an immediate boost of sales: after the launch of an ad campaign, a store owner starts receiving incoming orders really soon.
Here’s another tempting fact for you: when we use Instagram ads to promote our own stores, the average conversion cost stays at the level of about $2 for “Add to cart” and $5 for “Purchase”.
Sounds awesome! And it’s especially thrilling because it is quite simple to configure this type of ads.
In this article, we are going to tell how to promote Instagram posts via mobile apps. Plus, we will also explain how to create ads in Facebook Ads Manager.
Using two examples, we will analyze the effectiveness of each method: it will let us point out the strengths and weaknesses of each of them.
So, let’s begin!
Getting ready: improving your Instagram bio
Whatever method of setting up an advertising campaign you choose, make sure your own Instagram profile is informative and appealing to newly attracted visitors.
Check out these awesome insights into making an Instagram bio that turns your visitors into customers!
Ready? Now, let’s proceed with making your killer ads!
Creating advertisements in Instagram mobile app
“Instagram Promote” is a wonderful function that lets you promote posts from your Instagram account and attract more website visitors.
If you need the “Promote” function to be available in your store’s Instagram account, you need to connect this account to the relevant Facebook page. After that, you can transform your account into a business profile.
As an example, we decided to advertise thematic items for a target audience consisting of “My Neighbor Totoro” fans.
Choosing an Instagram post for promotion
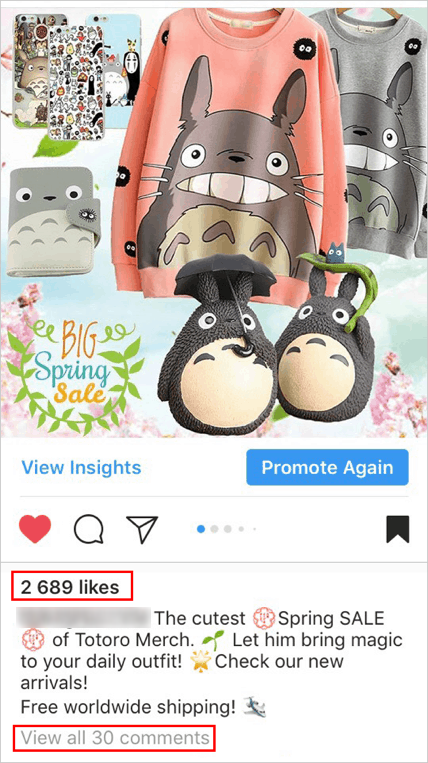
We created a post in the Carousel format: we uploaded 5 collages with the products that we want to advertise, and added promotional texts.
As soon as we published the post, the “Promote” button appeared under it: this is the button that lets us create an advertisement.
We recommend waiting for a while after publishing a post, so that subscribers have the time to put some likes on it. We noticed that likes on a post contribute to a wider and cheaper audience reach during paid advertising.
To start promoting a post, we pressed “Promote”.
Configure the objective and call to action
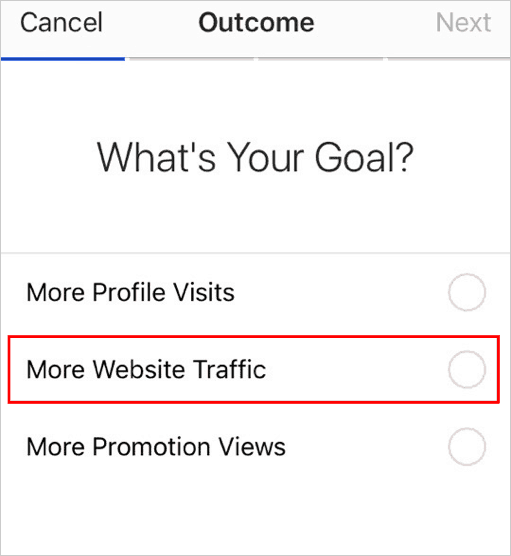
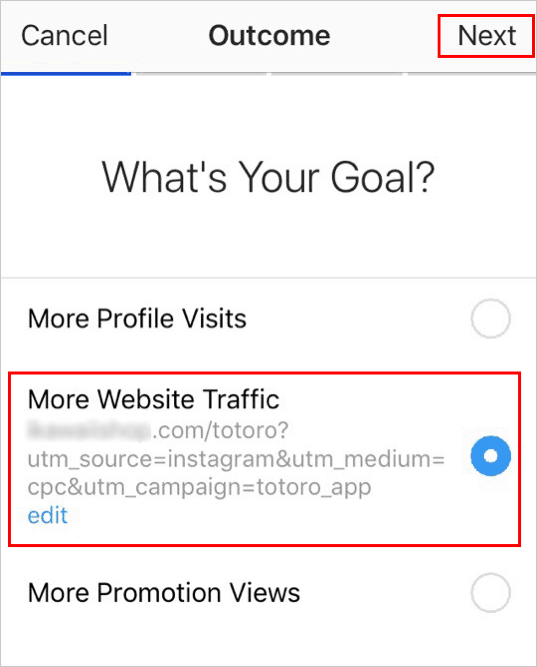
Instagram lets us choose an advertising goal out of several available options. More specifically, we can:
- Direct our target audience to our website
- Direct our target audience to our Instagram profile
- Send our target audience to a certain web address
- Show our target audience a phone number written in our business account
For our case, we picked the “More Website Visitors” goal.
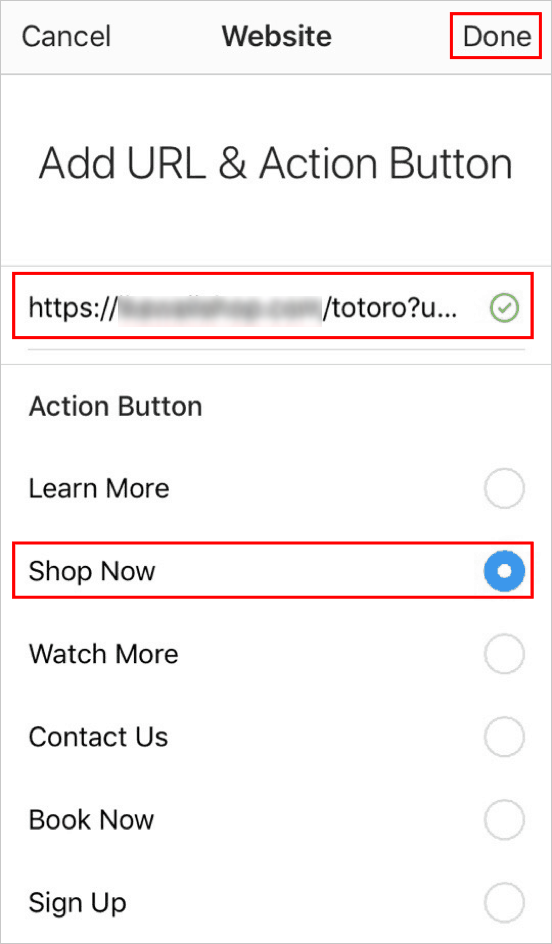
Then, we inserted the web address of the advertised product. At this point, we also need choose the Call to Action. In our ad, we’ve chosen the “Shop Now” option.
To move to the next step, we pressed “Done”.
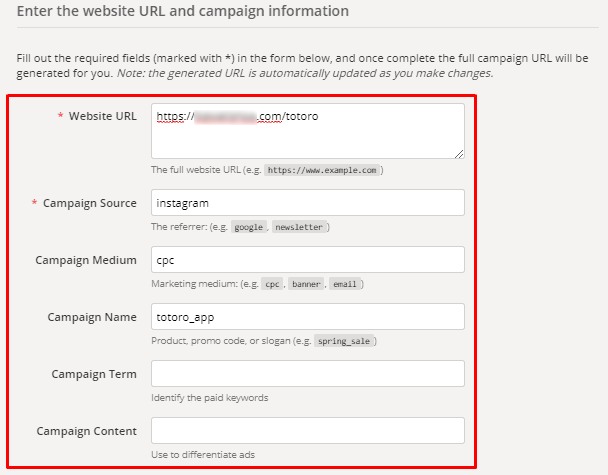
To track sales from this ad correctly, make sure to add UTM-tags to your URL. It will give you the opportunity to collect important statistical data for further research and strategy improvement.
As soon as the link was added, we pressed “Next”.
Defining a target audience
As an experiment, you can use an automatic audience configured by Instagram for you. However, we strongly recommend not to use this function: with this type of audience, your advertisements will be less effective and more costly.
We chose the “Manual” option and pressed “Next”.
In a new window, we set the parameters that are going to define our audience. At this point, we need to choose:
- Audience name
- Locations
- Interests
- Age
- Gender
After you press “Done”, you cannot edit an audience. If you want to change something, you need to create a new audience.
After we chose the created audience, we pressed “Next”.
Setting budget and duration
Here, we choose the campaign duration and advertising budget.
We recommend spending not less than $10 a day on one advertisement.
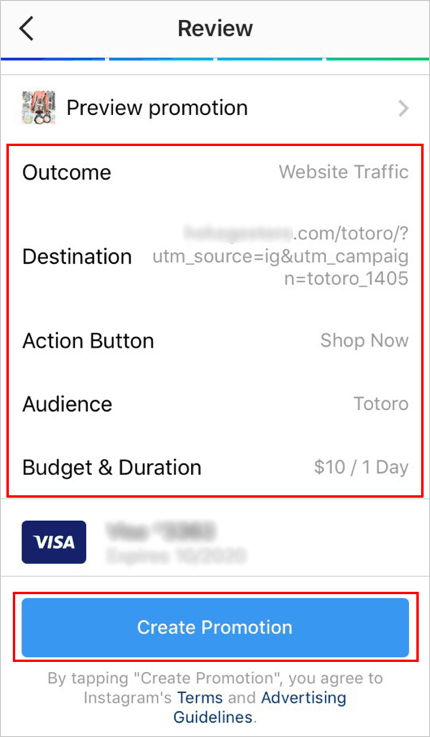
Then, we press “Next”. In a new window, we choose the advertisement parameters. We can also set the payment method for our advertisement.
To finish the advertisement creation and start showing it, we pressed “Create Promotion”.
Before launching an advertisement, we strongly recommend looking through Facebook Advertising Policies. If your advertisement does not comply with the rules, your ad is going to be rejected, which sometimes leads to your Facebook account being fully blocked.
As soon as your advertisement is approved, your potential clients will start seeing it!
We will describe the advertisement analytics below.
How to promote Instagram posts through Facebook Ads Manager
Choosing a goal for the campaign
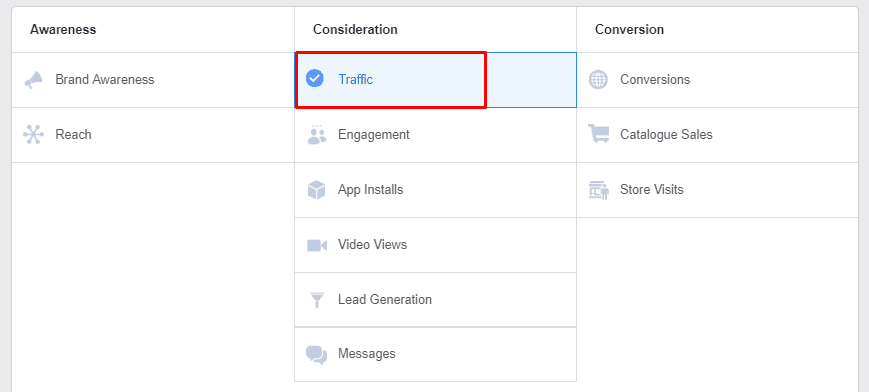
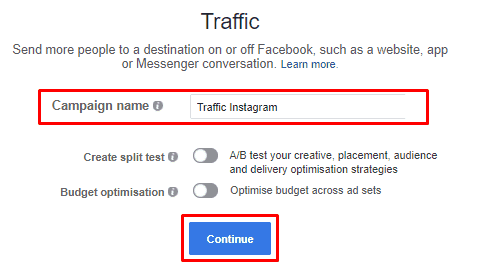
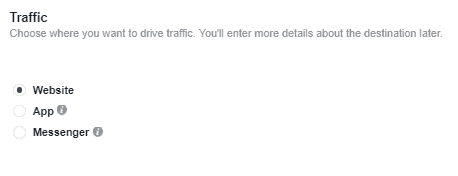
In Facebook Ads Manager, you can choose different goals for your advertisements. For our campaign, we’ve chosen “Traffic” as the main goal.
After giving a name to the campaign, we pressed “Continue”.
Selecting basic targeting and budget settings for an advertisement
Choosing where to direct our potential clients, we picked “Website” as the target destination.
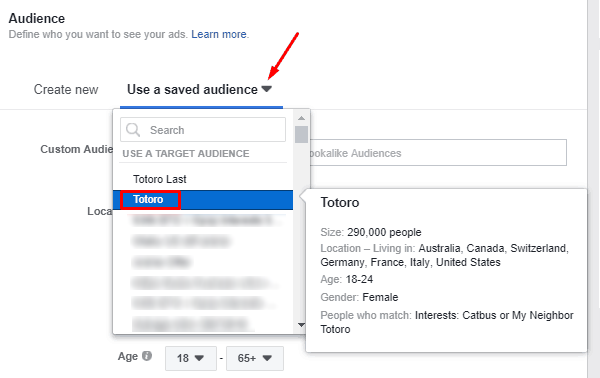
Then, we pressed “Use a saved audience” and chose the audience that we have saved while creating advertisements in our Instagram app on a mobile device.
Here, you can see the audience size, and other parameters that we have specified for this segment.
To check the audience targeting parameters, you can press the “Edit” button.
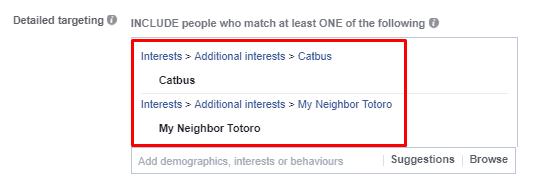
To set up the parameters (demographics, location, and interests), we followed the same algorithm as we had while creating an audience in a mobile app.
Here you can check the targeting settings connected with interests.
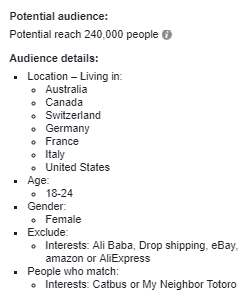
On the right, you will see the information on the audience size.
We got 240,000 people. That’s a good audience size!
Then, we chose “Edit Placement” to choose where our ads will be shown.
We edit Instagram ads, so we chose the ‘Mobile’ option in the “Device Type” section.
Then, we proceeded with the “Platforms” category, and chose the ‘Feed’ option in the ‘Instagram’ section.
Then, we chose to show ads on all mobile devices.
After that, we chose a budget that will be spent on ads on the daily basis.
Then, we chose “Link clicks” as an “Optimisation for ad delivery” option.
Now, it’s time to press “Continue” to proceed with the further ad setup.
Creating an advertisement
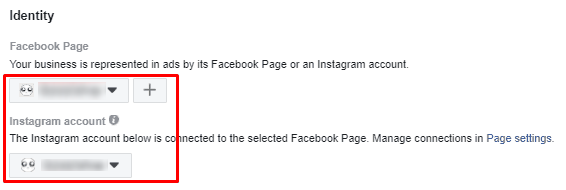
At this point, we need the Facebook business page created for our online store, and the Instagram account connected to this page. We will be showing ads from this account.
We have chosen Carousel as the format for our ad.
We wrote a promotional text for our ad.
We took the same images as we used to advertise products through Instagram app on a mobile device.
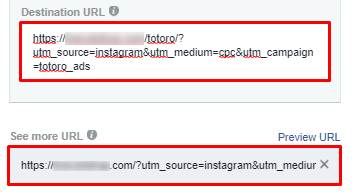
Then, we inserted a link leading to the relevant products.
In the “See More URL” section, we put the link that leads to a complete list of our store products.
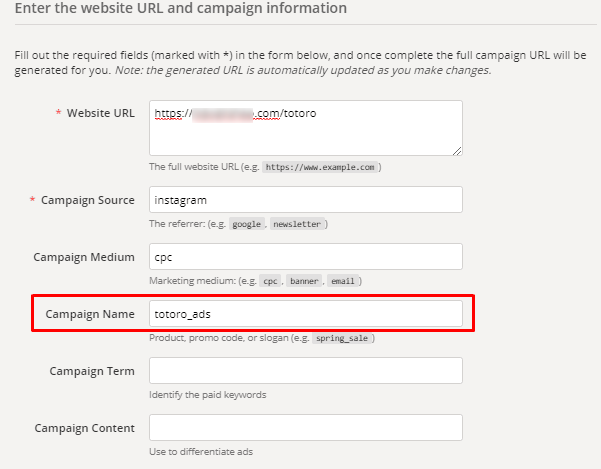
Make sure to mark your links with UTM-tags that are going to help you track the effectiveness of this advertisement. Notice that Campaign Name is different from the one we used while creating an ad through Instagram App.
While choosing an appropriate button in “Call to Action” dropdown, we selected the “Shop Now” option.
After that, we made ourselves sure that Facebook Pixel tracking is turned on.
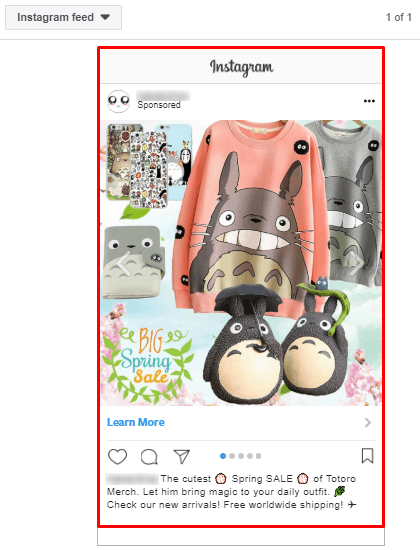
Here’s how this ad looks in Instagram Feed!
As you can see, the ads set up in Facebook Ads Manager don’t really look differently from the ads created with Instagram App.
So, we pressed “Confirm” and waited until the ad got approved.
If you use an identical audience to create ads both in Instagram App and in Facebook Ads Manager, don’t launch both of these campaigns at the same time! Your ads will compete with each other, and you will get unsatisfactory results.
Instagram Promoted Post vs Facebook Ads Manager: Experiment Takeaways
Now, let’s analyze how the ads worked, and figure out whether there is a difference in the their performance.
The ad that was set up with Instagram App received more than 2000 likes and 30 comments! This is a very impressive engagement, and it shows that the ad with the selected products was interesting for the audience.
This number of likes is potentially going to decrease the cost per click during the next ad promotion.
Since Instagram business profile is connected to the Facebook business page, we can also see ad stats in Facebook Ads Manager
Ad that was configured in Instagram App got the following results.
- Link Clicks – 166
- Reach – 17 469
- Amount Spent – $10.01
- Cost Per Click – $0,06
- Website Purchase – 0
- Post engagement – 942
- Post reactions – 731
- Post comments – 30

So, the ad that was configured in Instagram App for $10 attracted 166 people to our website. This ad had a high engagement! These results are especially good for an advertisement that had traffic attraction as the main goal.
However, this ad didn’t yield sales right away. Maybe the sales will come in a while, especially if retargeting catalog advertisements are configured: they help us retain customers who visited our site or added products to cart, but didn’t complete their purchase.
Now, let’s analyze the ad that was configured in Facebook Ads Manager.
- Link Clicks – 24
- Reach – 2068
- Amount Spent – $9.37
- Cost Per Сlick – $0.39
- Website Purchase – 2!
- Post engagement – 79
- Post reactions – 46
- Post comments – 0
- Page likes – 0
The click here cost us $0.39. Despite the high click cost and low engagement, this advertisement brought us 2 sales!
In the short run, the ad configured with Facebook Ads manager worked better, since we received sales in our online store.
However, the ad configured with Instagram App can also bring us sales in future. This ad was shown to more people, had higher engagement, and brought more people to the site, which, in terms of future sales, is a highly promising result.
How to promote Instagram posts: final thoughts
Instagram promoted post pros
- Quick and easy ad configuration
- Free organic traffic that allows a cheaper promotion
- Lower cost per click
- A quick and cheap method of attracting new subscribers to your Instagram profile
Instagram promoted post cons
- No advanced settings of an ad configuration
- Cannot be activated when you configure an ad for Facebook Pixel
- No way to add an additional link to all the products
Facebook Ads Manager pros
- Detailed ad settings that allow a precise ad tailoring
- An opportunity to connect Facebook Pixel to track conversions
- More options for advertisement analytics
Facebook Ads Manager cons
- A longer and more complicated configuration process
- High cost per click
- No free organic engagement
In our everyday practice, we use Facebook Ads Manager to promote our stores since it lets us tailor our advertisement really carefully. We experiment with promotional texts and creative content that significantly reduces the cost per click to the site.
But, it’s up to you to review and evaluate these options carefully and to decide how to promote Instagram post to bring more clients to your online store. Feel free to share your preferred configuration method for Instagram ads in the comment section below!

tutorials and special offers from AliDropship













Great article, especially since I am brand NEW to this!